Configurazione Dacos Omni Flex
Padroneggia la configurazione del tuo sistema DACOS Omni. Dall' STL alla calibrazione finale.
Padroneggia la configurazione del tuo sistema DACOS Omni. Dall' STL alla calibrazione finale.

- Scarica i file di Gemini
 Scarica il file STL dalla libreria DACOS Omni. Scegli tra Ultra o Light e l'offset (Tight, Standard o Loose). La cartella include anche tester di offset: stampane uno per primo per verificare la compatibilità prima di stampare con il calibratore completo. Standard è raccomandato per la maggior parte dei casi.
Ulteriori informazioni
- Preparati per la stampa
 Importa l'STL nel tuo slicer. Puoi utilizzare il file pronto per la stampa oppure fare manualmente il nesting. Se non sei sicuro della configurazione della tua stampante 3D, stampa prima il tester di offset.
 - Nesting corretto
 Posiziona i pins nell'attacco esattamente come mostrato in figura. L'unica restrizione critica: non posizionare perni di supporto all'interno dei bordi del magnete, poiché ciò potrebbe interferire con la precisione del posizionamento.
 - Post-curing del calibratore
 Dopo la stampa, rimuovere tutti i supporti con attenzione, proprio come faresti per i modelli dentali. Tratta il calibratore con la stessa precisione dei modelli clinici.
 - Installa la piastra superiore
 Posizionare la piastra Omni superiore sull'articolatore. Questa piastra è fissata direttamente, sia con una vite che tramite la connessione a fusione divisa.
 - Posizionare la Base
del Piastra Inferiore Posizionare il piatto diviso della split-cast inferiore sulla parte inferiore dell'articolatore. Questo forma la base del sistema di seduta calibrato.
 - Unisci le piastre con Gemini Calibrator
 Inserire il Calibratore Gemini per allineare le piastre superiori e inferiori. Riempire la cavità della piastra inferiore con un materiale tipo resina o gesso. Chiudere l'articolatore con il corrispettivo split-cast per bloccare il sistema.
Verificare che l'asta dell'articolatore sia impostato su 0 prima di chiudere.
- Consentire al materiale
di indurirsi Tieni l'articolatore chiuso e lascia che il materiale indurisca completamente. Questo assicura una connessione precisa e ripetibile tra le piastre superiori e inferiori.
 - 💡 Recommended MethodTo make positioning easier, first fix the lower plate with small silicone beads.
After checking the alignment and plane,- Fill and fix the upper plate with plaster while the articulator is closed.
- Once set, remove the silicone and fix the lower plate the same way.
Result:
After curing, both plates are perfectly aligned and ready for long-term, repeatable use on any articulator. - Stampa i tuoi modelli
 Stampa i tuoi modelli dentali utilizzando la stessa stampante, resina e impostazioni utilizzate per il Gemini Calibrator. La coerenza garantisce precisione e ripetibilità nel flusso di lavoro calibrato.
 - Inserisci Magneticon GlueJet Spider
 Posiziona le calamite nel GlueJet Spider. Inseriscili tutti in una volta nelle sedi del modello. Attendi fino a quando l'adesivo non si asciuga completamente (~10 minuti).
 - Pronto per l'articolazione
 I tuoi modelli sono ora calibrati e magnetizzati. Inseriscili nelle piastre Omni installate sull'articolatore.
 - Scarica i file di GeminiScarica il file STL dalla libreria DACOS Omni. Scegli tra Ultra o Light e l'offset (Tight, Standard o Loose). La cartella include anche tester di offset: stampane uno per primo per verificare la compatibilità prima di stampare con il calibratore completo. Standard è raccomandato per la maggior parte dei casi.
Ulteriori informazioni
- Preparati per la stampaImporta l'STL nel tuo slicer. Puoi utilizzare il file pronto per la stampa oppure fare manualmente il nesting. Se non sei sicuro della configurazione della tua stampante 3D, stampa prima il tester di offset.
- Nesting correttoPosiziona i pins nell'attacco esattamente come mostrato in figura. L'unica restrizione critica: non posizionare perni di supporto all'interno dei bordi del magnete, poiché ciò potrebbe interferire con la precisione del posizionamento.
- Post-curing del calibratoreDopo la stampa, rimuovere tutti i supporti con attenzione, proprio come faresti per i modelli dentali. Tratta il calibratore con la stessa precisione dei modelli clinici.
- Installa la piastra superiorePosizionare la piastra Omni superiore sull'articolatore. Questa piastra è fissata direttamente, sia con una vite che tramite la connessione a fusione divisa.
- Posizionare la Base
del Piastra InferiorePosizionare il piatto diviso della split-cast inferiore sulla parte inferiore dell'articolatore. Questo forma la base del sistema di seduta calibrato. - Unisci le piastre con Gemini CalibratorInserire il Calibratore Gemini per allineare le piastre superiori e inferiori. Riempire la cavità della piastra inferiore con un materiale tipo resina o gesso. Chiudere l'articolatore con il corrispettivo split-cast per bloccare il sistema.
Verificare che l'asta dell'articolatore sia impostato su 0 prima di chiudere.
- Consentire al materiale
di indurirsiTieni l'articolatore chiuso e lascia che il materiale indurisca completamente. Questo assicura una connessione precisa e ripetibile tra le piastre superiori e inferiori. - 💡 Recommended MethodTo make positioning easier, first fix the lower plate with small silicone beads.
After checking the alignment and plane,- Fill and fix the upper plate with plaster while the articulator is closed.
- Once set, remove the silicone and fix the lower plate the same way.
Result:
After curing, both plates are perfectly aligned and ready for long-term, repeatable use on any articulator. - Stampa i tuoi modelliStampa i tuoi modelli dentali utilizzando la stessa stampante, resina e impostazioni utilizzate per il Gemini Calibrator. La coerenza garantisce precisione e ripetibilità nel flusso di lavoro calibrato.
- Inserisci Magneticon GlueJet SpiderPosiziona le calamite nel GlueJet Spider. Inseriscili tutti in una volta nelle sedi del modello. Attendi fino a quando l'adesivo non si asciuga completamente (~10 minuti).
- Pronto per l'articolazioneI tuoi modelli sono ora calibrati e magnetizzati. Inseriscili nelle piastre Omni installate sull'articolatore.
- Scarica i file di GeminiScarica il file STL dalla libreria DACOS Omni. Scegli tra Ultra o Light e l'offset (Tight, Standard o Loose). La cartella include anche tester di offset: stampane uno per primo per verificare la compatibilità prima di stampare con il calibratore completo. Standard è raccomandato per la maggior parte dei casi.
Ulteriori informazioni
- Preparati per la stampaImporta l'STL nel tuo slicer. Puoi utilizzare il file pronto per la stampa oppure fare manualmente il nesting. Se non sei sicuro della configurazione della tua stampante 3D, stampa prima il tester di offset.
- Nesting correttoPosiziona i pins nell'attacco esattamente come mostrato in figura. L'unica restrizione critica: non posizionare perni di supporto all'interno dei bordi del magnete, poiché ciò potrebbe interferire con la precisione del posizionamento.
- Post-curing del calibratoreDopo la stampa, rimuovere tutti i supporti con attenzione, proprio come faresti per i modelli dentali. Tratta il calibratore con la stessa precisione dei modelli clinici.
- Installa la piastra superiorePosizionare la piastra Omni superiore sull'articolatore. Questa piastra è fissata direttamente, sia con una vite che tramite la connessione a fusione divisa.
- Posizionare la Base
del Piastra InferiorePosizionare il piatto diviso della split-cast inferiore sulla parte inferiore dell'articolatore. Questo forma la base del sistema di seduta calibrato. - Unisci le piastre con Gemini CalibratorInserire il Calibratore Gemini per allineare le piastre superiori e inferiori. Riempire la cavità della piastra inferiore con un materiale tipo resina o gesso. Chiudere l'articolatore con il corrispettivo split-cast per bloccare il sistema.
Verificare che l'asta dell'articolatore sia impostato su 0 prima di chiudere.
- Consentire al materiale
di indurirsiTieni l'articolatore chiuso e lascia che il materiale indurisca completamente. Questo assicura una connessione precisa e ripetibile tra le piastre superiori e inferiori. - 💡 Recommended MethodTo make positioning easier, first fix the lower plate with small silicone beads.
After checking the alignment and plane,- Fill and fix the upper plate with plaster while the articulator is closed.
- Once set, remove the silicone and fix the lower plate the same way.
Result:
After curing, both plates are perfectly aligned and ready for long-term, repeatable use on any articulator. - Stampa i tuoi modelliStampa i tuoi modelli dentali utilizzando la stessa stampante, resina e impostazioni utilizzate per il Gemini Calibrator. La coerenza garantisce precisione e ripetibilità nel flusso di lavoro calibrato.
- Inserisci Magneticon GlueJet SpiderPosiziona le calamite nel GlueJet Spider. Inseriscili tutti in una volta nelle sedi del modello. Attendi fino a quando l'adesivo non si asciuga completamente (~10 minuti).
- Pronto per l'articolazioneI tuoi modelli sono ora calibrati e magnetizzati. Inseriscili nelle piastre Omni installate sull'articolatore.

- Download Gemini FilesDownload the STL package from the DACOS Omni library. Select the plate size (Ultra or Light) and offset (Tight, Standard, or Loose).The folder also includes offset testers: print one first to verify fit before committing to the full calibrator. Standard is recommended for most cases.
Download Now
 Prepare for SlicingImport the STL into your slicer. You may use the ready-to-print file or arrange the nesting manually. If you are unsure about your 3D printer setup, print the offset tester first before slicing the full calibrator.
- Nest Attachments CorrectlyPlace attachments in the slicer exactly as shown in the reference. The only critical restriction: do not place support pins inside the magnet borders, as this may interfere with seating accuracy.
- Post-Processing the CalibratorAfter printing, remove all supports carefully, just as you would for dental models. Smooth and polish the surfaces to achieve a clean finish. Treat the calibrator with the same precision as clinical models.
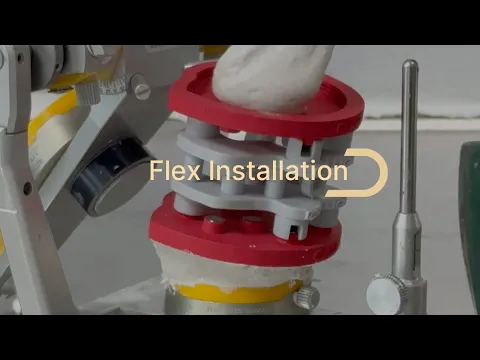
- Join Flex Plates with GeminiPlace upper and lower Flex plates on the Gemini Calibrator so they are unified as one block. This keeps upper–lower coordinates locked while you position them on the articulator.
- Align Occlusal Plane with ElasticWrap an elastic band around the articulator posts to form the Bonwill triangle. Align the calibrator’s occlusal plane parallel to the elastic. This is your reference for plane and VD.
- Set Incisal Pin to “0”Before fixing anything, set the incisal pin at 0. This locks the vertical reference for the rest of the installation.
- Fix Upper and Lower Plates with PlasterBoth upper and lower Flex plates must be permanently fixed with plaster or curable material.
- Keep them joined by the Gemini Calibrator and ensure the articulator pin is set at 0.
- Once positioned, fill the plates with plaster and let it cure completely before use.
- 💡 Recommended MethodTo make positioning easier, first fix the lower plate with small silicone beads.
After checking the alignment and plane,- Fill and fix the upper plate with plaster while the articulator is closed.
- Once set, remove the silicone and fix the lower plate the same way.
Result:
After curing, both plates are perfectly aligned and ready for long-term, repeatable use on any articulator. - Print Your ModelsPrint your dental models using the same printer, resin, and settings used for the Gemini Calibrator.Consistency guarantees accuracy and repeatability in the calibrated workflow.
- Insert Magnets with GlueJet Spider
- Load magnets into the GlueJet Spider.
- Insert them all at once into the model sockets, ensuring the correct polarity.
- Use the plunger to release and the presser tip to hold magnets flush until adhesive fully cures (~10 minutes).
- Ready for ArticulationYour models are now calibrated and magnetized. Place them into the installed Omni Plates on the articulator.The system delivers sub-20 µm repeatability, enabling precise occlusal and functional verification.
- Download Gemini FilesDownload the STL package from the DACOS Omni library. Select the plate size (Ultra or Light) and offset (Tight, Standard, or Loose).The folder also includes offset testers: print one first to verify fit before committing to the full calibrator. Standard is recommended for most cases.
Download Now
- Prepare for SlicingImport the STL into your slicer. You may use the ready-to-print file or arrange the nesting manually. If you are unsure about your 3D printer setup, print the offset tester first before slicing the full calibrator.
- Nest Attachments CorrectlyPlace attachments in the slicer exactly as shown in the reference. The only critical restriction: do not place support pins inside the magnet borders, as this may interfere with seating accuracy.
- Post-Processing the CalibratorAfter printing, remove all supports carefully, just as you would for dental models. Smooth and polish the surfaces to achieve a clean finish. Treat the calibrator with the same precision as clinical models.
- Join Flex Plates with GeminiPlace upper and lower Flex plates on the Gemini Calibrator so they are unified as one block. This keeps upper–lower coordinates locked while you position them on the articulator.
- Align Occlusal Plane with ElasticWrap an elastic band around the articulator posts to form the Bonwill triangle. Align the calibrator’s occlusal plane parallel to the elastic. This is your reference for plane and VD.
- Set Incisal Pin to “0”Before fixing anything, set the incisal pin at 0. This locks the vertical reference for the rest of the installation.
- Fix Upper and Lower Plates with PlasterBoth upper and lower Flex plates must be permanently fixed with plaster or curable material.
- Keep them joined by the Gemini Calibrator and ensure the articulator pin is set at 0.
- Once positioned, fill the plates with plaster and let it cure completely before use.
- 💡 Recommended MethodTo make positioning easier, first fix the lower plate with small silicone beads.
After checking the alignment and plane,- Fill and fix the upper plate with plaster while the articulator is closed.
- Once set, remove the silicone and fix the lower plate the same way.
Result:
After curing, both plates are perfectly aligned and ready for long-term, repeatable use on any articulator. - Print Your ModelsPrint your dental models using the same printer, resin, and settings used for the Gemini Calibrator.Consistency guarantees accuracy and repeatability in the calibrated workflow.
- Insert Magnets with GlueJet Spider
- Load magnets into the GlueJet Spider.
- Insert them all at once into the model sockets, ensuring the correct polarity.
- Use the plunger to release and the presser tip to hold magnets flush until adhesive fully cures (~10 minutes).
- Ready for ArticulationYour models are now calibrated and magnetized. Place them into the installed Omni Plates on the articulator.The system delivers sub-20 µm repeatability, enabling precise occlusal and functional verification.
Video Tutorial
Installazione di DACOS Omni - Tutorial completo del flusso di lavoro con con Antonello Croce
Installazione di DACOS Omni - Tutorial completo del flusso di lavoro con con Antonello Croce
Watch the Video Tutorial
🇺🇸
🇺🇸
Guarda il Video Tutorial
🇮🇹
🇮🇹